|
|
|
No. 10. CZ M-452 & M-455 Install a Light Trigger Spring and More
| Picture #1 | 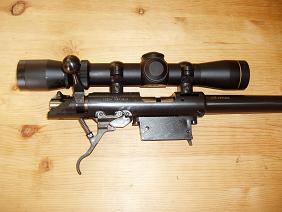 |
As always, the first thing to do before working on any firearm, is to be sure that it is not loaded.
This rifle is nearly new, but in an effort to reduce the weight of pull, the owner had already turned
the weight of pull adjusting nut downward, as far as it would go. This allows the trigger spring to relax
a small amount, which, of course, reduces the weight of pull a small amount. The trigger pull was 3lbs. 10 ozs. at this
point.
| Picture #2 | 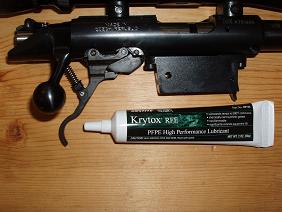 |
I have used various types of Moly
Lube for years, but this time, I had two reasons to try something else, namely, Krytox. Reason #1 it was highly
recommended. Reason #2 it costs $40.00 for a 2oz tube. I couldn't resist that last part.
First
I cleaned the trigger/sear surfaces with brake cleaner and then applied a dab of Krytox to each surface. After dry firing
10 times, I placed another little bit of Krytox on each surface. The next pull was 3 lbs. 5oz. that seemed really good
but I still wanted to try another Moly product that I had only used once before, this is Loctite Moly Paste #51048.
| Picture #3 |  |
I removed the Krytox with 3 applications of brake cleaner and a brake cleaner soaked paper towel.
After
dry firing 10 times, the pull weight had worked its way back up to 3 lbs. 10 ozs. the fact that the pull was back to its original
weight tells me that all of the Krytox had been removed.
| Picture #4 | 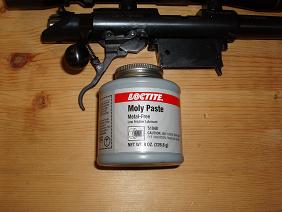 |
This time I placed a dab of Moly Paste on the trigger and sear surfaces. Then 10 dry
firing cycles, and another dab of Moly Paste. The next pull was 3 lbs. 2 ozs. Thats two in a row for the Moly
Paste.
| Picture
#5 | 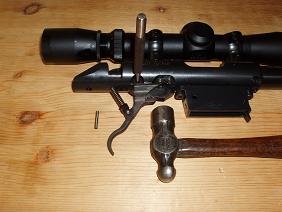 |
Next, we will remove the original factory spring, and replace it with one of my "Varmint" weight springs.
whatever decrease in weight of pull that we get will be due to the spring change and the Moly Paste.
Begin
trigger disassembly by tapping out the trigger pivot pin, with a pin punch, as shown.
| Picture #6 | 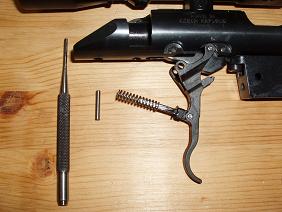 |
Remove the pin punch, swing the trigger
down, and slide the original spring off of its guide rod.
Place the new "Varmint" spring over
the guide rod. Now place the upper end of the spring in its receiver pocket, as you pull the trigger to the rear.
Next, line up the trigger pivot pin hole with its corresponding hole in the receiver. Start the pivot pin in place
just far enough to hold one side of the trigger in alignment with the receiver. Now, the back end of the sear can be
depressed far enough so that the pivot pin can be pushed the rest of the way in place. At this time you can check the
"feel" and weight of trigger pull. You will find the weight to be much lighter, but the amount of "creep"
will be the same. Some of you will be OK with this, and some of you will not.
| Picture #7 |  | | Picture
#8 | 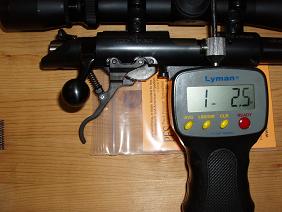 |
The weight of pull shown in picture #7 was achieved in just
2 simple steps. #1 Install the "Varmint" trigger spring, and #2 lubricate with Loctite #51048 Moly Paste.
Also, in picture #7, you can see that the weight of pull adjusting nut is turned all the way "up" which compresses
the trigger spring as much as possible.
You can lower the weight a little more by turning this adjusting
nut downward as you can see in picture #8
| Picture #9 | 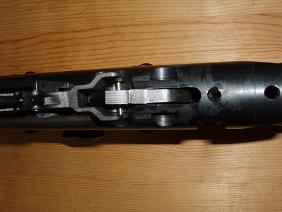 |
When working on the sear, just a few strokes of the diamond lap can take you from a really great trigger, to an un-reliable
trigger.
It is this possibility of an un-reliable trigger that makes me suggest to all of you who
are not gunsmiths, that you leave at least this portion of the job to someone with lots of experience doing this type of work.
| Picture #10 |  |
If you asked
10 different gunsmiths about how they would reduce the creep on this trigger, I'm sure you would get at least 10 different
answers.
This is the tool that works best for me it is an E-Z lap 1/4" X 1/4" X 6" "fine"
diamond lap. In use, the lap is held parallel to the bore and it cuts fast.
| Picture #11 | 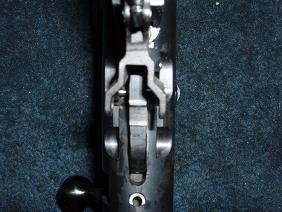 |
The narrow black line on the point of the sear represents the amount of material removed by the diamond lap.
| Picture #12 | 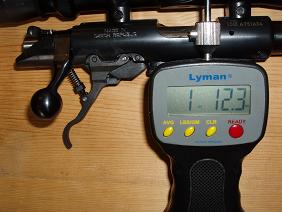 | | Picture #13 | 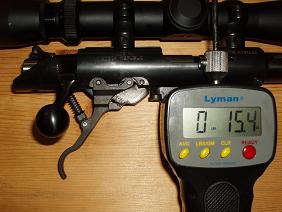 |
Pictures 12
and 13 show the weight of pull after the sear engagement was adjusted.
In picture #12 the adjustment nut
was turned back "up" for the highest weight possible.
In picture #13, the adjustment nut was turned
all the way "down" for the lowest weight possible.
You can see how almost all of the trigger pull
weight was lost by changing the spring. Ot's cheap and its easy.
Or a complete trigger job can be
had by using the spring, and having your gunsmith adjust the sear engagement.
No liability is expressed or implied
for damage or injury which may result from the improper installation or use of this product.
Item #2010
|
|