HomeShop OnlineSpecialsShipping/PoliciesContact UsWholesale Info
    Back 

Shop Online
Trigger Springs for Rifles
Trigger springs for Shotguns
Accu-Risers
Aluminum Pillar Bedding Stock
Aluminum Pillar Bedding Kits
" Pillar Align" Pillar Installation Tools
Gunsmithing Odds and Ends
Miscellaneous Gun Parts
 

No. 9. M-700 X-Mark Pro Adjustable Install a Light Trigger Spring


   Lighten and Smooth the NEW M-700 X-Mark Pro Adjustable Trigger  introduced by Renington in 2009.


 Picture #1
 RemingtontriggerwithbrokensafetyNo2007.JPG
                                                                        
   Picture #1 shows the trigger assembly, it's 2 retaining pins, and the broken safety lever.
   First, I must say that it is not necessary to remove the trigger assembly from the action in order to replace the weight of pull spring.  However, if someone decides to remove the trigger assembly for cleaning or for any other reason, I should show you an example of something to avoid.  If the rear trigger retaining pin is driven out from the wrong direction, and the safety is in the forward, or "Fire" position, the safety lever can be broken off


 Picture #2
 Rembrokesafety2014.JPG


   Picture #2 shows the rear trigger retaining pin protruding slightly above the flat side of the trigger housing.  Just imagine where an unbroken safety lever would be at this point.  If the pin is driven out, toward the lever, the lever will be broken.


 Picture #3
 Remingtontriggerwithbrokensafety025.JPG
 
    In the trigger on the right, the safety lever has been pulled to the rear, and into the "Safe" position.  This will provide clearance for the pin to pass by, even when driven out from the wrong direction.  Better yet, drive the pins out the other way.  
   The ends of my trigger alignment pins are also visible in this trigger on the right.  These pins provide an easy way of maintaining alignment of the sear and sear spring as you re-install the trigger assembly back into the receiver.


Picture #4
 RemTrigger014.JPG
   
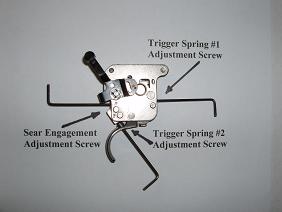
   This New X-Mark Pro Adjustable trigger assembly, introduced in 2009, has two trigger weight of pull springs.  When the trigger is pulled, both of these springs are compressed.  Either one of these springs, by itself, is capable of creating a heavier weight of pull than most of us would prefer.
   The starting weight of pull for this particular trigger, with factory springs and adjustments. is 4 lbs. 10 oz's.
   This picture shows an allen wrench inserted into each of the two trigger spring adjusting screws.  Both of these screws will be utilized during the installation of this spring, and adjustment of this triggers weight of pull.
   
This picture also illustrates an allen wrench inserted into the sear engagement adjustment screw, this third wrench's only purpose is to make clear the physical location of this screw.
   The final trigger pull weight of 2¾ lbs. was achieved without making any adjustments to this sear engagement screw.


 Picture #5
 no2NewX-MarkPro004.JPG


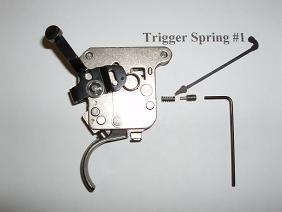
   I'll call this trigger spring
#1, simply because it is located in the same place as the single spring in the original, or old style triggers.
   This is the only spring you will need to replace.


 Picture #6
 no3NewX-MarkPro018.JPG


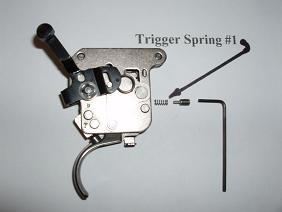
  This is the new spring, ready to install.  Turn the adjusting screw in until its head is flush with the trigger housing.  Use some type of sealant to prevent further movement of this screw.
   In my effort to shift as much
 "work" as possible to trigger spring #2, I have made this new spring very light.


 Picture #7
 no4NewX-MarkPro033.JPG
   
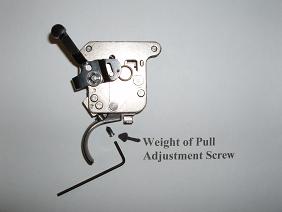
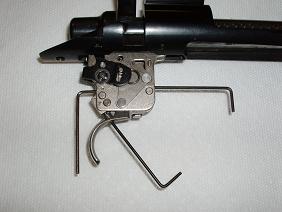
   Trigger spring #2  is located 
under this new triggers weight of pull adjustment screw, but cannot be easily removed or changed.  Given the type of parts, and the amount of disassembly required, I believe the best solution is to leave this spring in place.  When the adjustment screw is removed as seen in picture #4, the second trigger spring remains loosely captured within the trigger housing.
   In other words, when this adjustment screw is removed, the second trigger spring is still inside the trigger housing, but it is placing no pressure at all on the trigger.
   This adjustment screw offers one more example of where freedom and responsibility go hand in hand.
   This screw offers the freedom of some adjustability, within the "normal"
(3 lbs) hunting rifle weight of pull range.  But also the responsibility to not go to far. (or too light).


 Picture #8
 no5X-MarkPro015.JPG


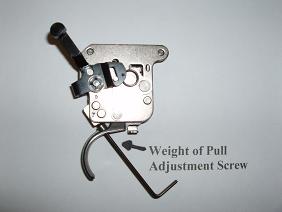
   In this picture, the weight of pull adjustment screw has been re-installed, and turned  all the way "In".  The weight of pull for this sample trigger at this point is 3 lbs. 10ozs.   This is 1 lb. lighter than the starting weight of pull.                                           


 Picture #9
 no6X-MarkPro005.JPG


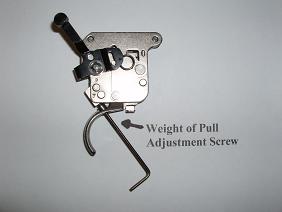
   With the weight of pull screw backed out 1/2 turn, the new weight of pull is
3 lbs. 0 ozs.


 Picture #10
 no7X-MarkPro015.JPG
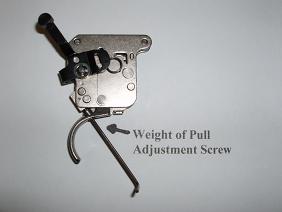
   By backing the weight of pull screw out a total of 3/4 turn, this trigger now has a pull weight of 2 lbs. 12 oz's.
   My strong recommendation is that you not back this screw out any more than this 3/4 turn.
  The most consistent weight of pull results are achieved when the trigger spring remains compressed within its normal operating range
throughout the entire movement of the trigger. 
   When the weight of pull screw is backed out more than 3/4 turn, the trigger spring is allowed to extend past its normal operating length, and shot to shot weight of pull consistency is lost.
   These X-Mark Pro series triggers respond well to use.  The scratchy, creepy feel goes away, they get a little lighter, and the shot to shot weight of pull becomes much more uniform. 
   The use necessary to attain these benefits is quickly accomplished, simply by dry firing the rifle.  If you lubricate the nose of the striker, the cocking cam, and the back side of the bolts locking lugs occasionally as you dry fire the rifle, you will smooth up more than just the trigger.  If your rifle is new, or nearly new, I think you will be pleasantly surprised at how much smoother and easier your rifle bolt lift, and overall bolt operation will become.  How many cycles are necessary, you ask? 200 is a nice round number that works well.
   During the first 100 cycles, I suggest that you lightly lubricate 3 to 4 times.  Then about each 50 dry firing cycles after that.
   With the simple installation of a spring, plus the break-in process described above, you will have a great hunting rifle trigger.
   And remember, this 2¾ lb. weight of pull was achieved with no reduction in the factory set sear engagement.
   A gunsmith who is throughly familiar with adjusting Remington triggers, can further reduce this weight of pull with a very small adjustment of the sear engagement.

A Review

   After reading through the entire trigger spring installation process above, lets review the 3 easy steps necessary for a 2 & 3/4 lbs. to 3 lb. trigger pull.
   Return to picture #4, above, and be sure that you are familiar with the locations of trigger spring #1, and trigger spring #2.

Step #1.   Replace trigger spring #1 with my light spring for Remington  
                M-700 X-Mark Pro Adjustable triggers.
Step #2.   After being sure that the trigger spring #2 adjusting screw is 
                turned all the way "In" or "Tight", turn it "Out" 3/4 turn.
Step #3.   Next, complete the "Break In" process described in picture #10.

   With triggers that can be taken apart, gunsmiths have lots of ways to lighten, smooth, and "Artificially Break them In" without actually dry firing them for hundreds of rounds.
   However, since this trigger should NOT be taken apart, our best alternative is a combination of the old, (dry firing) and the fairly new,(moly lubricant).  We can "Marry" the trigger and the sear simply by dry firing, or we can greatly speed up this process by lubricating with molybdenum disulphide, and then dry firing.  Yes it will take some time, but it sure is simple, and the results are great.
   This process will smooth the trigger pull, it will lighten the trigger pull, and most important of all, it will make the weight of pull more uniform.
   At this time, I have achieved the lightest weight of pull while using Loctite #51048 Moly Paste lubricant which contains 65% molybdenum disulfide.
   I expect that other moly based lubricants which contain a similar percentage of moly will achieve similar results. Two other examples would be  Honda Moly 60 paste # 08734-0001 and TS Moly # TS 84.
   Use of one of these moly based lubricants is an important step in this process.


No liability is expressed or implied for damage or injury which may result from the improper installation or use of this product.


Item #2009


  Back