GUNSMITHING ODDS AND ENDS:#6 - ALL STOCKS NEED PILLARS, EVEN STOCKS WITH BEDDING BLOCKS
How to convert your aluminum bedding block stock to the more accurate pillar bedding system, in 17 photos. It's Easy!
All stocks need pillars, even stocks with aluminum bedding blocks.
PICTURE #1
This Accu-Riser Kit fits the following applications:
Remington M-700 in an H-S Precision, a Bell and Carlson Medalist, or a Remington factory installed stock with an aluminum bedding blockH-S Precision Pro-Series 2000, in an H-S Precision stockWinchester M-70 in an H-S Precision or a Bell & Carlson Medalist stock
NOTE: I DO NOT recommend Accu-Risers for use with rifles or stocks not mentioned above.
Don't miss an opportunity to actually FIX your rifle's bedding problem.
"Skim Bedding" just locks the receiver firmly in the same position that has been the problem all along.
Both the H-S Precision, and the Bell & Carlson Medalist stocks have an aluminum bedding block with a machined bedding surface. Also, we know that our rifle's receiver is a machined part. Since these two parts are both machined, it seems logical that when we assemble these two items, we should only have to install the guard screws, tighten them, and be done with it. This seems especially true with a Remington, where you are placing a round receiver against a "V Block".
But wait, is your action straight? Most are not! The heat treat process occurs AFTER the reciever is fully machined. During this heat treat process, each receiver will warp in its own small, but unique way. This warpage, by itself, prevents a stress free fit of the receiver to the bedding block.Accu-Risers and epoxy are not just the easiest way to deal with this warpage, but the most accurate way as well.In stocks of wood or fiberglass, in addition to a precise fit, pillars provide resistance to compression when the guard screws are tightened. In a stock with a solid aluminum bedding block, more resistance to compression is not the concern, the concern is FIT. By adding pillars to an aluminum bedding block stock, you gain control of where and how the receiver is supported in the stock. This is so important that I am going to say it again, with Accu-Risers, you gain control of where and how the receiver is supported in the stock. Accu-Risers may look like washers, but they are pillars in every sense of the word. They work in the same way, and provide exactly the same benefits as the longer pillars you may have used in other types of stocks. Accu-Risers are the short little pillars which complete the strongest trio available in pillar bedding.
AFTER INSTALLING ACCU-RISERS YOU WILL HAVE:
1. The solid foundation of an aluminum block molded into the stock2. The action stress relief provided by stainless steel bedding pillars3. The precision fit of epoxy resin
Pillars provide solid support for the receiver. This support immediately surrounds the trigger guard screws. The closer this line of contact is to a trigger guard screw, the less leverage there is available to bend the receiver when these screws are tightened.Accu-Riser Kits contain 2 each of the following sizes, .005", .010", .015", .020", and .030". By stacking different thickness combinations, you have the choice of any height necessary, from .005" to .080" in .005" increments. Accu-Risers are manufactured from 18-8 stainless steel.

PICTURE #2
Tools you may want to use for this installation
You may have a brand new rifle that came from its manufacturer equipped with an aluminum bedding block stock.You may have a new H-S Precision, or Bell & Carlson Medalist stock ready to install on your old M-70 or M-700.
You may have a used Remington Sendero.
You may have an accuracy problem with any of the above.Or maybe you just want the best fit possible.
NOTE: Accu-Risers are NOT suitable for use in the HOGUE brand stocks with aluminum bedding blocks.
In any of these cases, I suggest that you or your gunsmith do this simple "Spotting In", and create a picture of how well your action and stock fit each other, (or NOT). Use a Q-tip to daub inletting black on the lower 1/2 of the receiver, and then smooth it out with a shaving brush. Place the stock in a vise with padded jaws, and now place the barreled action in the stock. Next, rotate the barrel back and forth with 1 hand, while holding the receiver squarely and firmly down against its bedding surface with your other hand. The goal is to transfer inletting black from the receiver to the stock. Now you can identify each point at which contact was made between the two. "Spotting In" with no guard screws is the only method which provides an accurate view of your receiver's contact with its bedding surface in the stock. Just don't be surprised if the contact points are small, and that there are not many of them. A customer said that he had good results "Spotting In" his stock by using a felt tip marking pen, instead of spreading inletting black around with a brush. In his case, the marks left on the aluminum bedding block, provided clear evidence as to why the barrel twisted to one side each time the guard screws were installed and tightened. Each case is different, because each receiver is different. You can play detective by noting the location of each contact point relative to the guard screws, and then visualizing which way the receiver will bend when those guard screws are tightned.
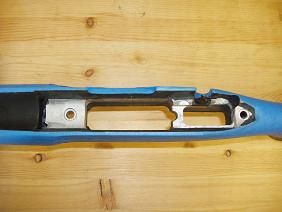
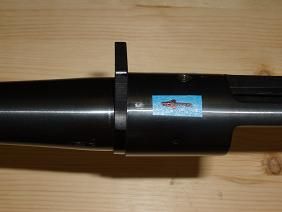
This is an example of "Spotting In" while using hand pressure only, so as not to bend the receiver.
Don't use a mallet, and don't use the stress of a guard screw.
Do your "Spotting In" with hand pressure only, as this provides a picture that tells the truth.


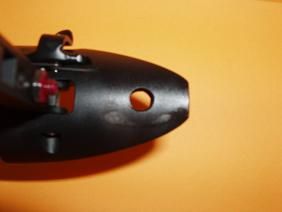
Pictures #3A and #3B
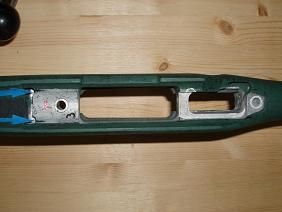
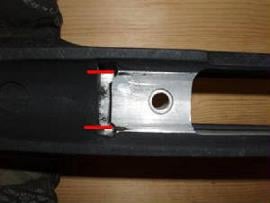
Show both sides of the same point of contact. Notice the blue arrows which point out the largest areas of contact between the stock and the receiver.
You will see that the location of this contact is about 3/4" in front of the guard screw.
When this screw is tightened, the aluminum bedding block is not going to bend or compress to allow more complete contact between itself and the receiver.
The relatively weak mid section of the receiver will bend and allow what appears to be nearly full contact with the stock. This is backwards! The receiver must not bend to fit the stock.
The bedding surface in the stock must be made to fit the receiver.
Accu-Risers are the easiest and most accurate way to do this.

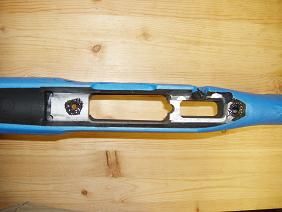
PICTURE #4
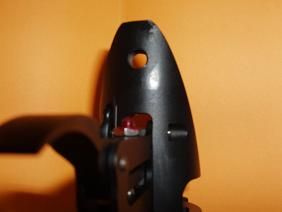
The red dots illustrate the location of the contact points between the receiver and the stock as they exist in Picture 3B.
Just look at where the contact points are located. Then look at where the guard screws are located. Now imagine tightening those screws. What do you think is going to happen to the receiver?
The unsupported area of the receiver, which is adjacent to each guard screw, will be pulled downward until it contacts the aluminum bedding block, and after having 65 inch lbs. of torque on the guard screws, and shooting for a while, you will be able to remove the barreled action from the stock and find what appears to have been good contact between the two.
This amount of contact was only achieved by bending the receiver!
There is nothing wrong with 65 inch lbs. of guard screw torque, but only if your action has a form fitting foundation strong enough to support that much pressure. MOST WILL NOT.
The good news is that a solid aluminum bedding block with stainless steel pillars (Accu-Risers), and hard epoxy filling all the voids, is the strongest foundation available.
By the way, 1300 lbs. of clamping force is generated by a 1/4" screw which has been tightened to 65 inch lbs. of torque.
P.S. There is a difference in how hard the different epoxies are.
P.S. There is a difference in how hard the different epoxies are.

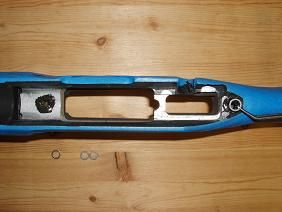
PICTURE #5
This picture shows a pair of Accu-Risers which were painted orange for clarity, and then positioned in the bedding area of the stock.
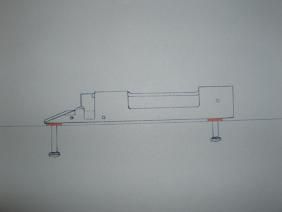
PICTURE #6 The orange lines in this drawing illustrate the Accu-Risers location, as seen in Picture #5.
Now when you tighten those guard screws, the receiver is pulled squarely down against a pair of stainless steel bedding pillars, which closely encircle those screws.
This way, there is almost no leverage available to bend and distort the receiver.Also illustrated is how the front, the rear, and the mid section of the receiver are "free", as I say it, to find their own resting spots in a bed of soft epoxy.
If your action has been blueprinted, it was done while the receiver was under no bending pressure or stress at all.
Those locking lugs, which were machined and lapped to fit so well with the receiver at rest, will NOT fit the same way if the receiver is forced to bend by pressure from the guard screws.
If this fit of the locking lug surfaces is to be maintained, a receiver at rest must be maintained!
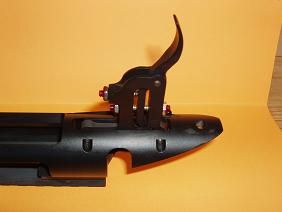
PICTURE #7
Select a combination of Accu-Risers which, when placed between the receiver and the stock, create a clearance of .010" or less.
Verify this clearance by assembling the entire rifle (with Accu-Risers in place and guard screws tightened to only 10 in. lbs.), then be sure that you have enough clearance to slide a piece of paper between the receiver and the stock, and the barrel and the stock, at any point (as shown in Picture #7).
Remember, that since the outside surface of the receiver is not straight, this clearance will not be uniform from end to end, or side to side.
Less clearance is better, but you must have at least "some" clearance everywhere.
Or, to put it another way, at this point in the process, the barreled action must be supported entirely by the
Accu-Risers, and with no other contact between the barreled action and the stock.
This is a condition that must first be met before moving on with the creation of a full receiver contact epoxy bedding surface.
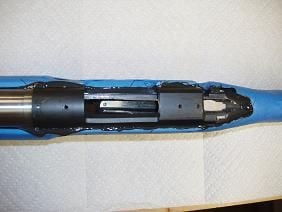
PICTURE #8
During the previous step, we have determined that on this particular rifle, an Accu-Riser height or thickness of .050" is necessary to support the barreled action about .010" above the aluminum bedding surface in the stock.
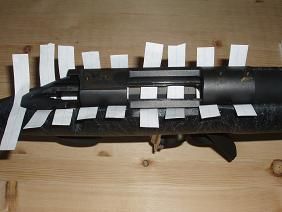
Now, without removing the Accu-Risers, lift the barreled action out of the stock and prepare to wrap the barrel with masking tape.
Locate this tape just to the rear of the forearm tip. I place a few more wraps of tape on the barrel than are necessary to fill the barrel channel in the forearm.
Next replace the barreled action in the stock and estimate how much tape is necessary to remove in order to fit the taped barrel into the barrel channel.
The goal of course is to remove tape until a small amount of clearance is obtained between
the tape and the barrel channel.
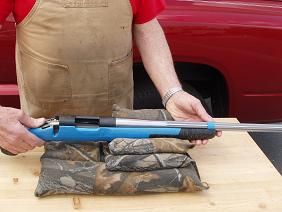
An easy way to check for this clearance is shown in Picture #8.
When both hands are placed as shown in the picture, and sufficient tape has been removed from the barrel, you will be able to push down on the receiver tang with your right thumb and feel a small amount of upward movement by the barrel with your left forefinger.
Remember that your .050" (in this case), stack of Accu-Risers must be in place at this time.

PICTURE #9
Fill the trigger slot, the bolt stop slot, and the trigger pin holes with modeling clay.
Also add a layer of masking tape to the bottom of the recoil lug, but leave all 4 sides tightly bedded (NO TAPE).
With a round receiver, the largest surface available to resist rotation, when firing the rifle, are the sides of this lug.Now is the time to apply some type of mold release.
For the best fit, use the release agent which creates the thinnest build-up on the surface of the metal.
Johnson's Paste Wax is my favorite. Apply with a brush, a cleaning patch, or a Q-Tip.
After allowing this wax to dry for a few minutes, buff it off with a soft cloth, just like you would buff the wax off your car.
For a little extra peace of mind, I go through this wax and buff sequence twice.
Cover every surface where epoxy, in your wildest dreams, could possibly go. Don't forget the guard screws.
PICTURE #10
In Picture #10, we have cleaned the aluminum bedding surface with lacquer thinner so the epoxy will stick.
We have also masked the exterior of the stock so the epoxy will not stick.
Use a Q-Tip to wax the interior of the guard screw holes and any other surfaces where you do not want the epoxy to stick.
Having this beautiful aluminum foundation means that we will be able to install these
Accu-Risers and bed the receiver in ONE step.
My epoxy of choice for this work is Marine Tex Gray. The 2 ounce size is the most convenient.
Another excellent choice is Devcon Aluminum Putty.
PICTURE #11
When you are sure that all surfaces needing protection from epoxy have been masked or waxed, it's time to mix some of this wonderful stuff and apply a small amount in each "pocket" as shown in Picture #11.
PICTURE #12A
It will almost always be necessary to place 2 or more Accu-Risers in each "pocket".
The correct order of placement is epoxy first, as we see in the previous picture, an Accu-Riser next, as we see in Picture #12 A, then another dab of epoxy, followed by the second Accu-Riser.
Repeat this order until your chosen thickness of Accu-Risers have been placed in each pocket.
.jpg)
PICTURE #12B
Picture #12B is a close up view of Picture #12A.

PICTURE #13
Once both stacks of Accu-Risers are in place, it's time to add a bed of epoxy sufficient to support the entire bedding surface area of the receiver, and the recoil lug.
Do you add a little epoxy to support a small bit of the barrel in front of the recoil lug? The choice is yours.
PICTURE #14
Here the barreled action has been placed into its bed of epoxy, and since the Accu-Risers and aluminum foundation are in place, you DO NOT have to hold things together with surgical tubing.
Go ahead and install the waxed guard screws and tighten to about 10 inch lbs. of torque.
Follow your epoxy manufacturers guidelines for curing time and temperature.
The best way to isolate the stock and receiver from stress while the epoxy is hardening, is to support the entire rifle by its barrel. This can be done in many ways, but I use a short piece of 2X4 with a hole drilled near 1 end.
Clamp this short (6" to 8") piece of 2X4 in your vise, then slide the rifle's barrel into the hole in the 2X4.
Soon after the rifle has been suspended by its barrel (while the epoxy is still as soft as possible), use Q-Tips soaked in WD-40 to clean up the excess epoxy.
After this excess epoxy has been cleaned up, play it safe, and do not disturb or move the rifle until you know the epoxy is hard.
After all of the previous preparation, the final quality of this fit will be determined as the epoxy hardens.
Once again, the purpose of this bedding process is to fit the stock to the receiver, without it being necessary for the receiver to adjust itself to the stock in any way.

PICTURE #15
Here is a completed Accu-Riser installation, in a Bell & Carlson Medalist stock.
Picture #15 shows how all the criteria described in Picture #7 have been met.
Namely, that after the receiver and the guard screws were installed, and as the epoxy was hardening, the receiver was being supported entirely by the Accu-Riser Pillars and that there was no other contact between the receiver and the stock.
If the receiver was being contacted by the stock at some other point, this point would show through the bed of epoxy.
The receiver's contact points with the pillars are clearly visible, where they show through the surrounding epoxy.
They are just in front of, and to the rear of, each guard screw.
Accu-Risers: Other Examples
EXAMPLE #1A
.221 Remington Fireball
EXAMPLE #1B
Here again we have the same .221 Remington Fireball shown above in Example #1A.
This action was taken out of its original wood stock, and is now being installed for the first time in an H-S Precision stock, which was purchased as an after-market accessory item.
The bedding contact pattern shown above in Example #1B was achieved by brushing the receiver with inletting black and then placing the barreled action in the stock.
Next rotate the barrel back and forth with one hand, while placing firm downward pressure on the receiver with your other hand.
Now, remove the barreled action from the stock to view your rifle's "Real" action-to-stock fit - "Real" meaning without the stress of guard screws bending the action.
EXAMPLE #2
In this example we have a Remington Sendero SF in cal. 7mm. Remington Ultra Mag.
This rifle and H-S Precision stock were assembled by Remington and sold as a complete top of the line rifle.The bedding contact pattern shown on the left was achieved in the same way as described in Example #1.
EXAMPLE #3A
This is an example where both the action and the stock were manufactured by the same company, and at the same time.
The rifle is an H-S Precision Pro-Series 2000, in cal. .338 Lapua.
EXAMPLE #3B
No inletting black was applied to this action. The shiny spot in this photo is simply a "wear pattern" created by hard contact with the aluminum bedding block at that point.
There is no corresponding "wear pattern" on the other side of the tang. This tells us that the bedding contact is uneven, with extra pressure being concentrated at the point of wear, and on one side only.
EXAMPLE #3C
I have chosen these 3 examples because they illustrate how a bedding problem can (and likely does) exist in any combination of factory or after-market parts.
Remember Ernie's Rule:For the least amount of stress in your action, build your action's foundation while using the least amount of force!